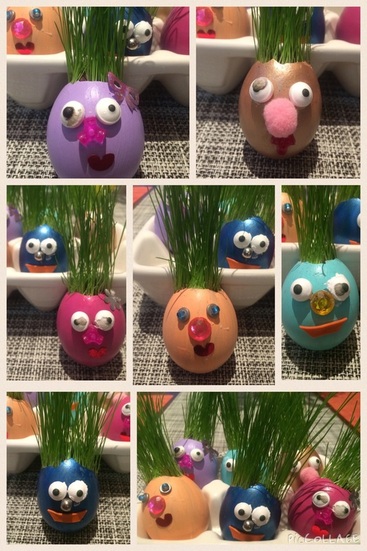
Each year I try to imagine a new Easter Egg project to make with my boys. This year, memories from my kindergarten days inspired me to recreate an old favorite - the Easter Egg Grass Heads (as I like to call them).
It's actually really simple. Here are the steps for creating your own Egg personalities for Easter:
It's actually really simple. Here are the steps for creating your own Egg personalities for Easter:
- First you need the egg - I didn't use anything fancy to crack open our eggs, just a gentle tap at the top of the egg to get a somewhat smaller opening. I know there are tools out there that you can use now that create a nice clean cut. If you have that great...if not I wouldn't worry.
- Clean out your eggs with warm water and then let them dry out. I just waited a couple of days until I collected my other materials.
- Find your paint. We mostly used different indoor/outdoor latex paints we already had. I did buy a couple of new colors from Martha Stewart's (Premium Multi-Surface Craft Paint). We applied 2-3 coats per egg depending on how much coverage we wanted. Let this dry for one day. (HINT - it's easiest to turn your eggs upside down and balance them with a pencil that is resting inside a glass).
- Next add your facial features. This was were you can get really creative! We found some old candied eyes from a previous cupcake project, old beads, sequins, confetti, rhinestones. Whatever sparks your imagination. I used a superglue to apply everything so it set really fast.
- Now it's time to get the hair ready to grow. Add some garden soil and then sift in some grass seeds on the upper layers.
- Water your Egg Personalities lightly since there is no drainage until you start to see some green shoots pop out. Now that ours have grown quite bit (in about 5 days time) I water them 1-2 times per week. I think before Easter comes we'll be able to give them a haircut.
Hope you enjoy making your Easter Egg Grass Head Personalities!
 RSS Feed
